Jamón—A Love Affair

I’ve eaten my way across 99 per cent of Europe, and up until this summer, that did not include Spain. After watching my favourite professional eater and writer, Anthony Bourdain, wax poetic about canned seafood and tapas, I’m surprise I was so uninterested. Let’s just say I enjoyed it – immensely.

Spain is a vegetarian’s worst nightmare—ham is king and it’s glorious. Spain, and its chefs, have been the focus of much adoration in the culinary world for the last ten years, and with good reason. With a mind-boggling array of seafood, produce, cured meats and wines, you couldn’t possibly get tired of eating there. I decided to see what Bourdain had been talking about with the canned seafood. These made amazing lunches with a few cheap beers and bread. You can find the standard mussels in oil, but the real treat were the baby eels in garlic and the octopus in pimenton.

Jamon Iberico, a typical cured Spanish ham.

Eating at the local markets is always a safe route where snacking and walking is highly encouraged. This high form of noshing can be done at Barcelona’s Boqueria or Madrid’s Mercado San Miguel. The idea is to grab a glass of wine and migrate from stall to stall. Grab a plate of olives, and take them to the fried fish lady and then finish at the pastry station.

Spain also has a healthy obsession with gin and tonics, and I’m not talking rail gins. You can find tonics made locally by artisanal producers and gins from Spanish brewers. Wine is always the obvious choice but vermouth is popular as well. A popular Barcelona haunt is Bobby Gin, which had a fun tapas menu as well.

Tapas are the most ubiquitous, and the best restaurants were always the least obvious. The fewer frills the better. This was easily one of the greatest food trips of my life—and I hadn’t even eaten at Ferran Adrià’s!

The First Day of Fall Calls for Apples

Hello again! After a prolonged hiatus, I have returned with more fun recipes to dirty your kitchen, warm your soul and share with friends—if sharing is your thing. It’s fall in Toronto, and as everyone is rushing towards the nearest Starbucks for their pumpkin spice latte fix. I, however, am rushing to Pinterest and my recipe books for all things pie. So many fillings, so little time.

These self-contained apple pies were inspired by the numerous recipes I stumbled across on Pinterest. If you’re feeling confident, you can make your own dough for the lattice topping. I recommend the Food Network’s Alton Brown for tips on making a flawless crust. For these, I cheated and used a package of Tenderflake pastry that I cut into strips, wove into a lattice and trimmed to fit my apple tops.

Self contained apple pies
Trim excess dough from around the apple edges.

As for the filling, you are free to make it as sweet and cinnamon-y as you like! Granny Smith apples are the gold standard for pie filling because of their firm texture and tart flavor. Scoop out two apples with a melon baller, chop the insides and mix with 1/8 of a cup of sugar and ½ of a teaspoon of cinnamon. Spoon the filling back in to your carved-out shells.

Self contained apple pies
Carve the apples out as close to the skin as you can without breaking the peel.

Bake the apples in a baking dish with just enough water to cover the bottom of the pan. This helps to steam them a bit. Cover them with foil and put in a preheated 375 degree oven for about 20 minutes. Remove the foil at the end and let the crusts brown off for about 10 minutes. Top with caramel, ice cream, whipped cream or all three if you like!

Pumpkin flavored everything!

Image

Fall in Toronto—my favorite time of year! It’s a very short window between summer’s stifling heat and winter’s soul-crushing cold so enjoy it while you can! The following recipe is a combination of my two favorite things—pumpkin and crème caramel and hopefully provides some inspiration to use pumpkin in something other than pie. The addition of rum also gives this dessert a little extra layer of flavor that I had not thought to add before.

This is one of my favorites, a throw-back from Good Housekeeping Magazine’s 2010 fall issue, and there are only a few things I would do differently. First, don’t be shy with the rum—perhaps throw in an extra tablespoon or two. Second, if you want to go the extra mile, use a fresh vanilla bean instead of extract (that is about 1 bean per teaspoon). Finally, don’t be intimidated by this! The hardest part is leaving it to chill overnight!

Ingredients

1/4 cup(s) water
1 1/4 cup(s) sugar
1 can(s) (14-ounce) coconut milk (not cream of coconut), well shaken
3/4 cup(s) heavy or whipping cream
1 cup(s) solid-pack pumpkin
6 large eggs
2-4 tablespoon dark or coconut rum
2 teaspoon(s) vanilla extract (or vanilla bean)
1/8 teaspoon(s) salt
Freshly whipped cream, for garnish
Toasted shredded coconut, for garnish
Grated nutmeg, for garnish

1. Preheat your oven to 350 degrees F

2. For your caramel, heat your water and 3/4 cup sugar in a saucepan and bring to a boil on medium to medium high heat. Stir to dissolve the sugar. Let this cook for about 5-9 minutes and DO NOT stir it until you get a nice amber color. Pour the finished caramel into a round ceramic or metal pan that is at least 2 inches deep and make sure to coat the bottom nicely.

3. In another pan, heat your coconut milky, cream, and remaining 1/2 cup of sugar and bring it to a boil on medium to medium high heat.

3. In a large bowl, whisk together your pumpkin, eggs, rum, vanilla, and salt until incorporated.

4. Slowly whisk in the hot milk mixture into your pumpkin mixture until well incorporated. You want to slowly incorporate the two so the hot milk does not “scramble” the egg in your pumpkin mixture. This is important for the texture.

5. Now, pour the pumpkin mixture through a sieve into an 8-cup glass measuring cup, than right in to your caramel-coated pan. Put your pan inside another roasting pan that is slightly larger and put these on an oven rack.

6. Pour boiling water from a kettle into the roasting pan until it come about 3/4’s of the way up the side of your round dish.

7. Bake your crème caramel for 45-55 minutes. Check for doneness at the 35 minute mark if you are using a metal pan. To check for doneness, insert a knife and if it comes out clean when inserted an inch from the edge of your baking dish, it’s finished. The center will still be slightly wiggly.

8. Remove your custard from the water and allow to cool for about an hour before putting in the fridge to cool overnight. To remove, gently run a spatula around the side of the pan and flip on to a pretty serving dish. Garnish with your whipped cream, toasted coconut, and nutmeg.

Summery Asparagus and Shrimp Risotto

Risotto gets a bad rap for being fussy and difficult to execute, but it’s just rice guys! It’s takes a few tries to get the idea of how much liquid you need and how long you want to let it cook before it gets too goopy, but it’s completely doable. This is not a meal I would recommend making for large crowds. It takes a lot of arm power and all of your attention so you can’t be meandering around a party while the risotto stirs itself, it’s fussy like that.

This meal was originally intended to be a nice, at-home, date night meal. Let’s just say there wasn’t much time spent lovingly gazing at each other from across the candlelit table. It was more like tag-team cooking where every 10 minutes, when one of us could not possibly stir the risotto for another minute, tapped out and handed it off to the other. It’s time consuming, but it’s absolutely worth it! You have been warned. Here’s a video I found helpful- Marco Pierre White makes it look effortless, and it will be after a few tries, I promise.


Asparagus and Shrimp Risotto

Asparagus and Shrimp Risotto

3 cups reduced-sodium chicken broth
2 cups water
3/4 pound asparagus, trimmed and cut into 1-inch pieces
1 small onion, finely chopped
4 tablespoons unsalted butter, divided
1 1/4 cups Arborio rice
1/4 cup dry white wine
3/4 pound medium shrimp, peeled and deveined
1 tablespoon grated lemon zest
1/4 cup grated parmesan
2 tablespoons chopped flat-leaf parsley

1. Bring broth and water to a simmer in a medium saucepan. Add asparagus and simmer, uncovered, until just tender, about 4 minutes. Transfer asparagus with a slotted spoon to an ice bath to stop cooking, then drain. Keep broth at a bare simmer, covered.

2. Cook onion in 2 tablespoons butter with 1/4 teaspoon salt in a 4-quart heavy saucepan over medium heat, stirring occasionally, until softened, about 5 minutes.

3. Add rice and cook, stirring constantly, 1 minute. Add wine and simmer, stirring constantly, until absorbed.

4. Stir in 1/2 cup broth mixture and briskly simmer, stirring frequently, until absorbed. Continue adding broth, 1/2 cup at a time, stirring frequently and letting each addition be absorbed before adding the next, until rice is creamy and tender but still al dente (it should be the consistency of a thick soup), about 18 minutes. (There will be leftover broth mixture.)

5. Stir in shrimp and cook until just cooked through, 2 to 3 minutes.

6. Stir in asparagus, zest, remaining 2 tablespoons butter, parmesan, parsley, and pepper to taste. (Thin risotto with some of remaining broth if necessary.)


Spring Patio Fare For The Scallop Lover

Summer is the season of the BBQ, sauce slathered pork products and obscene amounts of grilled protein– or at least in our family. I’m partial to some lighter fare on occasion, so this scallop appetizer is the perfect prelude to BBQ’s heftier main courses. This recipe came from Gordon Ramsey’s ‘Fast Food’ cookbook, which I got as a birthday present, and this scallop dish has been on a pretty steady rotation, especially when we’re entertaining.

Although Gordon pan sauteed the scallops, I think grilling them could give them a little more depth and smokiness. Also, consider grilling the corn before making your salsa if you want to go the extra mile. And whatever you do, DO NOT overcook your scallops. There is nothing worse than a chewy little hockey puck. No amount of sauce can fix that. I find Ramsay’s video EXTREMELY helpful when I’m working with something I’ve never done before. Here is part 1 of his video on pan searing the perfect scallop. Getting enough heat in the pan is very important and it takes a little practice- here is part 2 of the video. 

Happy cooking!

**Note** Make a double batch of your corn salsa and use it for tacos!

Scallops with fresh corn salsa

Sautéed scallops with corn salsa:

12 scallops, shelled and cleaned

½ tsp medium curry powder

2 tbsp olive oil

Small handful of arugula leaves

Corn salsa:

14oz can corn, drained

7oz cherry tomatoes, quartered

1 red chili, seeded and minced

1 red onion, peeled and minced

2 scallions, trimmed and finely sliced

3 tbsp sesame oil

Handful of cilantro, roughly chopped

Juice of 2 limes

Dash of light soy sauce

Sea salt and black pepper

For the salsa, combine all the ingredients in a pan and stir over medium heat for 2 minutes to warm through.

Halve the scallops horizontally into two disks. Mix the curry powder with 1 tsp sea salt and sprinkle over the scallops. Heat a large skillet over high heat and add the olive oil. Pan-fry the scallops for 1 minute each side until golden brown at the edges, turning them in the same order you put them in the skillet to ensure they cook evenly; don’t overcook.

Spoon the salsa onto warm plates and arrange the scallops on the top. Scatter over a few arugula leaves and serve.

Double Chocolate and Banana Tart

Happy May Everybody! Spring has finally sprung here in Toronto! It’s time to get some fabulous French bistro-style desserts going to enjoy out on your balconies. This chocolate  banana tart is easily one of our favorites and is a show-stopper. The caramelized bananas pair perfectly with the rich chocolate and a little serving goes a long way. This recipe is from Dorie Greenspan’s ‘Around My French Table.’ This is a stellar cook book and is filled with tons of detailed information and multiple variations on many of her recipes. It is also covered in sticky little fingerprints from all the cooking we’ve done with it!

Just some tips before you get started- if you don’t have a food processor, no worries. I have made this crust using only my hands to cut in the butter. You have to work quickly, though otherwise the heat from your hands will melt it and you’ll have chocolate paste all over your hands! I would also recommend using two bananas in your caramelized filling. I like having a little more creamy banana in each bite with the ganache.

Chocolate Shortbread Tart Crust

1/4 cup all-purpose flour
1/4 cup unsweetened cocoa powder

1/4 cup confectioners’ sugar
1/4 teaspoon salt
9 tablespoons of VERY cold unsalted butter, cut into tiny pieces
1 large egg yolk

Caramelized Bananas

1 ripe, firm banana
fresh lemon juice

1 1/2 tablespoons unsalted butter
3 1/2 tablespoons of sugar

Bittersweet Ganache

1/2 pound bittersweet chocolate, very finely chopped
1 cup plus 2 tablespoons heavy cream
4 tablespoons (1/2 stick) unsalted butter, cut into 4 pieces, at room temperature

Banana Topping

1/2 cup apricot jam, strained
2-3 ripe, firm bananas
fresh lemon juice

Tart Crust

Pulse dry ingredients in a food processor
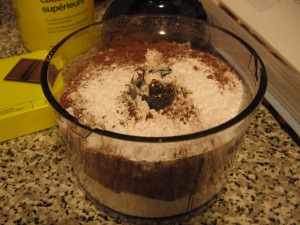
1. 
Place all dry ingredients in a food processor and pulse to combine. Sprinkle the pieces of butter over the top and pulse until the butter is cut in.

2. Whip your egg yolk and add to the food processor little by little, pulsing until incorporated.

3.  Once you have what may look a bit like sand, you can mold a few small balls of the dough and place them in to your buttered tart pan. Press the dough down in to the tart pan, moving from the center out to the sides.

4. Once you are satisfied with your crust, prick over the surface with a fork to keep it from puffing up in the oven.

5.  Cover it with foil and place it in the freezer for a minimum of 30 minutes. If you’re making the tart ahead, the crust will be good in the freezer for up to five days.

6. Set your oven to 375 degrees F. Butter a piece of aluminum foil big enough to cover your crust and press it gently down on top of your crust.

7.  Bake for 25 minutes. Remove the foil after 25 minutes and bake for an additional 8 minutes to crisp up the crust a bit. If it got puffy, just press down on it gently with the back of a spoon.

Caramelized Bananas

Caramelize bananas in butter and sugar
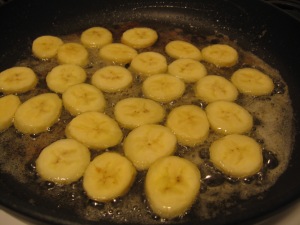
1. Slice your bananas in to thick slices at an angle and toss them with lemon juice to keep them from getting brown.

2. Heat your skillet over high heat and melt your butter. Once it melts and starts to bubble, place your bananas in the skillet and gently turn them to coat them in the butter.

3. Sprinkle sugar over the slices and cook on high until you have a golden coat over both sides. Be very careful when turning them!

4. Remove them from the heat and place them on a plate to let them cool.

Bittersweet Ganache

Banana1
1. Put a heatproof bowl over the top of a simmering pot of water. Place your chocolate in the bowl and stir it gently until it starts to melt.

2. Once it is melted nicely, stir in your butter bit by bit and whisk gently until it is smooth and silky looking.

3. Arrange your caramelized bananas in the bottom of your baked tart shell and pour the ganache over the top. Tilt the crust back and forth to get a nice even finish.

4. Chill the tart in the fridge for 30 to 60 minutes to let it set.

Banana Topping

Arrange bananas over the top of your ganache
1. Boil your apricot jam in the microwave or in a small sauce pan. If it has apricot bits in it, run it through a strainer for a nice smooth glaze.

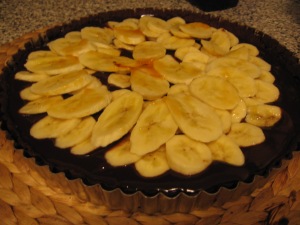
2. Cut your bananas in to 1/4 inch slices and at an angle. Gently toss them with lemon juice to keep them from turning brown. Arrange them in a circular pattern over the top of your chilled ganache.

3. Drizzle your apricot glaze over the top of your bananas and allow it to cool.

**When you’re ready to serve, pop the sides off of your tart pan, slice and serve!***

Shrimp and Sausage Gumbo Y’all!

IMG_1919Gumbo is one of the tastiest soups out there. The key is to use the best ingredients you can find.  Since it is still a relatively inexpensive dish to make, you still won’t end up burning too big of a hole in your pocket. So make the sacrifice and spend a bit extra  on a farmer’s market pepper instead of your grocery store peppers. Also, don’t feel limited by the recipe as this originated as a “kitchen sink” kind of dish where you just tossed in what you had. Get creative!

The original recipe that I always refer to is from Paul Prudhomme’s Louisiana Kitchen. This book was on our kitchen shelf for as long as I can remember and I can probably blame my overzealous interest in food on it. My Dad (who knows I was always obsessed with this book) drove it up to Toronto for me last fall. He is currently transferring all of the VHS tapes that came with the book to DVD! This is all pre-Food Network stuff- it’s hilarious.

**So a few notes on the ingredients**

Stock: I highly recommend using a home made stock instead of a cube or powder. It’s too big of a component to skimp on. Getting bones from your local butcher is easy and very cheap. If you simply don’t have time, a lot of specialty food stores do carry stocks that are also very good.

Roux: Don’t panic with this one and go slow! If you burn it, no biggie. Just toss it and start again. It takes about 30 minutes to get the perfect color- milk chocolate brown. If you’re a boss, you can try to make the black roux which is technically the correct one to use for gumbo according to Prudhomme.

Filé Powder: This is an optional addition but it’s an authentic Cajun touch. It is a spice of ground sassafras leaves that you probably won’t have too much trouble finding in the South. I buy mine at the St. Lawrence Market in Toronto.

I used a very similar recipe from Chef Scott Hargrove, who posted his version here on YouTube.  I’m also including the Prudhomme version below. Make sure you have a big pot! I used my Creuset a.k.a. Big Red.


299024_10100446525067031_975611048_n
SCOTT HARGROVE VERSION
1 1/2 cups celery, finely chopped
1 1/2 cups bell pepper, finely chopped
2 cups onion, finely chopped
2 bay leaves
1/4 cups garlic, minced
2 cups green onion, finely chopped
1 pound okra, sliced (fresh or frozen)
1/4 cup parsley chopped
Roux: 1/2 cup of vegetable oil and 1/2 cup of flour
2 pounds of shrimp
1 pound of sausage (Andouille is best)
8 cups of seafood or chicken stock
1. Heat your pot over low to medium heat and add your flour and oil to start your roux. Cook it slowly until it is a dark, rich brown, like chocolate. This can take anywhere from 20-30 minutes. If you burn it, TOSS IT! Start again because you will not be able to get the burnt taste out of the gumbo. Watch Scott’s video for more details.
2. Add your celery, bell pepper, onion and bay leaves. Cook for about two minutes. About four minutes.
3. Add your minced garlic to the pot and stir. Add okra and stir until it looses it’s “stringiness” on medium high heat. Check out Scott’s video to see what I mean by “stringy” if you have never had okra before. When it is not longer “stringy” add a handful of shrimp (not all of it!) and the full pound of sausage. Mash the shrimp down into the sausage a little. It adds a nice base seafood flavor.
4. Add parsley, green onions and eight cups of stock. Bring to a boil and simmer for about 30 minutes with the lid slightly off.
5. Season to taste at the end with salt, pepper and Tobasco. Add the rest of your shrimp in the last five minutes and cook until pink.
Serve with white rice in bowls

PAUL PRUDHOMME VERSION

2 c chopped onions
1 1/2 c chopped green bell peppers

1 c chopped celery
Seasoning Mix:
2 whole bay leaves
2 t salt
1/2 t white pepper
1/2 t cayenne pepper
1/2 t black pepper
1/2 t dried thyme leaves
1/4 t dried oregano leaves

3/4 c vegetable oil
3/4 c all-purpose flour
1 T minced garlic
5 1/2 c stock (seafood)
1 pound andouille smoked sausage cut into 1/2 inch pieces
1 pound peeled medium shrimp
1 dozen oysters with liquor
3/4 pound crab meat

1. Combine seasoning mix in bowl and set to the side.

2. Heat oil in your skillet (or Creuset) until it starts to smoke (5 minutes). Slowly add the flour, constantly whisking. Continue cooking until the roux is dark red-brown to black (if you’re brave).

3. Add your vegetables once you reach the desired color and stir well. Cook for three minutes and then add your dry seasoning mix and cook for an additional 2 minutes. Add the garlic and cook for an additional 2 minutes. Remove from heat.

4. Put your stock in a large saucepan or Dutch oven and bring to a boil. Add your roux my the spoonful, stirring to dissolve. Add your sausage and boil for 15 minutes. Reduce the heat to a simmer for an additional 10 minutes. Add the shrimp, oysters and crab meat. Bring it back to a boil, stirring occasionally. Remove from heat and skim the oil off the surface.

5. Serve immediately with rice in the middle of the bowl.

Yay! We’re back!

Big Red PotHello All! We’re up and running again. We took a little hiatus to get some cooking done over the last few months. With the hubby in B-School there have been fewer opportunities to get cracking in the kitchen, but the holidays were a great time to try out some new stuff and revisit old favorites.

We also have some new additions to our kitchen family- a brand-spanking new Imperia pasta maker, a bath-tub sized Le Creuset pot and a Cuisinart immersion blender. I have been pureeing everything since the addition of the immersion blender! Soups, coulis, salsa, broccoli! It has to stop or we’ll be on a baby food diet shortly.

Keep reading and stay tuned for some good stuff!